Workflows

Workflows

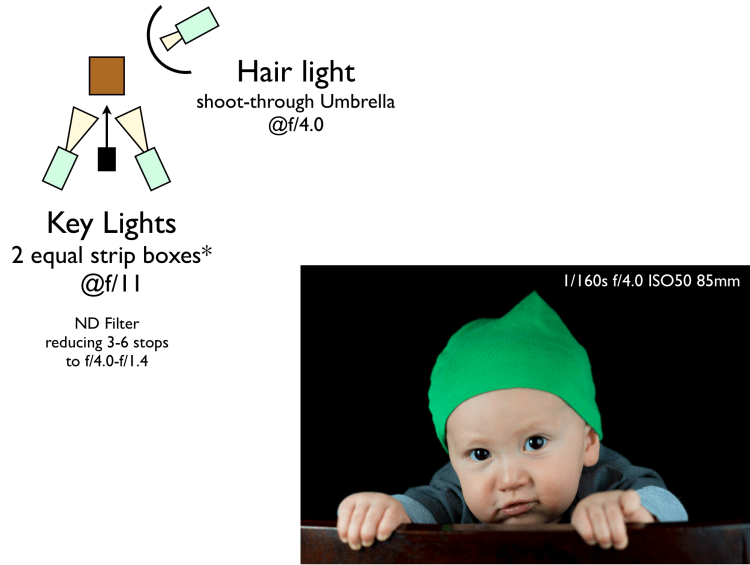
When I say I took 1000 photos at an event, I often get horrified and even quizzical looks.  But mostly I get a question of how do I deal with that volume.  And the answer is having a workflow.

Every photographer has their own workflow. When I’m at an event, I tend to take between 500 and 1500 photos. With so many photos, there is a wide range of quality and no one, even the photographer and subject, wants to look through so many photos. Editing down is critical to have a high quality album. It’s also important to be able to do it fast and to not get stuck. So having a regimented workflow is useful to make this process manageable.

My workflow has been settled down for sometime now and I get done with a shoot in about a day or two of solid work and without much agony.

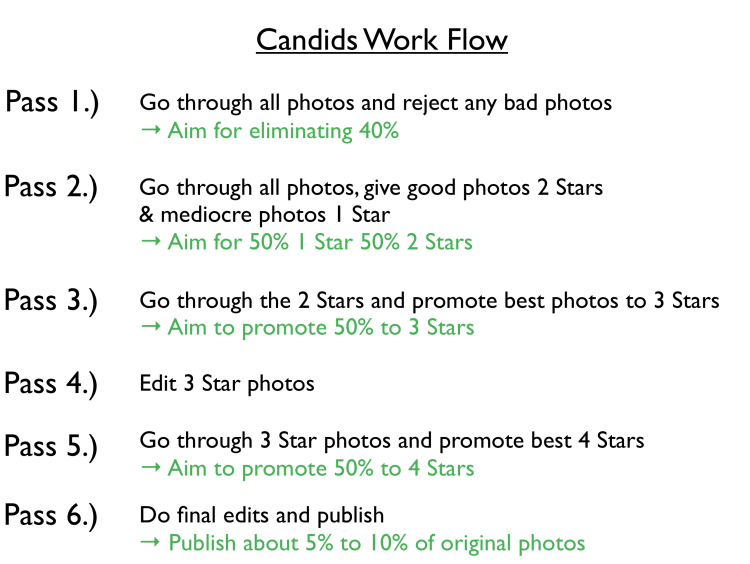
The workflow is as follows. The first step is relatively straight forward. I go through and simply reject the objectively flawed photos and make some decisions on photos that are nearly identical. I don’t spend much time agonizing over this step. If a photo looks bad at first blush, chances are it isn’t one of the best. This step is one of the most demoralizing steps because you’re looking at all the warts. I am to reject about 40% of all the photos. I usually just delete these photos and never have to look at these failures again.

The next step is to go through all of the photos again. This time, instead of rejecting the photos, I mark the best photos as two stars and the less good photos as one star. I aim to do a 50-50 split between the one and two star photos. The two star photos are now 30% of the original set.

The next phase is to do a pass through the two star photos. The better photos I upgrade to three star photos. I upgrade about 50% to three stars, which means that I’m down to 15% at this point. With 1000 photos, I’m down to 150 photos.

By this point, it’s necessary to start editing the photos to start evaluating the good from the mediocre.  I first crop the photos.  Over the first three passes, I’d mentally cropped the photos, but now it’s time get the exact frame down.  This is surprisingly challenging.  Frequently in candids there are extraneous, distracting elements in the frame that have to be delicately cropped out.  After the cropping, I usually do exposure and then drop the blacks, raise the shadows and drop the whites. I pump up vibrance and clarity a hair. I sometimes adjust the individual color levels, frequently futzing with the greens and blues to bring out the green grass and blue sky. I sometimes darken the reds or lighten the reds depending if the skin is red. I tend to avoid any retouching at this stage, I just want to get the overall idea of what the picture will look like.

The next step is getting close to the final selection. I go through the edited three star photos and find the best photos to promote four stars. I aim to upgrade the about 50%. I also downgrade a few to two stars.  At this stage, I’m looking for photos that catch something special.   I make sure everyone in the photos are looking good, though this is a highly subjective criteria.  I really try to make sure that I’m not falling in love with the memory of the moment rather than the image itself.   If there are a lot of a few people, I’ll make the hard calls and downgrade some good, but not great, photos in order to maintain balance.

At this stage I’m at about 7.5% of the originals. They’ve been partially edited. It’s at this stage I do the retouching. I whiten teeth and eyes. I eliminate any pimples or moles on the face and soften wrinkles. If any more serious retouching such as liquifying.  This is time consuming work and is fairly mind numbing.

I go through the photos one last time and may be downgrade a couple that are either repetitive or ones I have fallen out of love with. I make sure that I have all the content I need by flipping through the two and three star photos and promoting any necessary shots to four stars and doing the final edits.  If any of the photos belong in my portfolio, I’ll upgrade them to five stars.

At this stage, I’m ready to go. From a shoot of 1000, I’m down to 50 to 75 candids or so that hopefully catch the feeling of the event. I haven’t had to agonize too long over individual photos. Most importantly, I’m proud of every shot I’m putting out. I’ve looked at each one on six separate passes.  By having a deliberate workflow, I’ve reduced the decision making process to something that is standardized.  I’m not spending a lot of time editing bad photos, I’m only doing preliminary edits on 15% and the time consuming final edits on half that.

Usually after I post photos, I’ll flip through the one star photos one last time, upgrade a few to two stars and then delete the rest.  Realistically, these photos won’t ever see the light of day again.   Later on, perhaps a month or so later, I’ll do a review of the entire album, which contains about 30% of the original.  I’ll delete the two star photos.  This will leave me with about 15% of the originals, which is a pretty good collection that doesn’t tax storage and is manageable to use later on.

Photobooth At An Eating Contest

Photobooth At Yishan Wong's Eating Contest

Last weekend we attended an eating contest. My husband was invited to this even through the question-and-answer social networking site Quora. I love shooting parties and an eating contest party was sure to have a lot of drama.

One thing I like to do at parties is to set up a photobooth off in the corner where I can have proper lighting and have a consistent setup. This way I can grab a decent number of perfect exposures that are tack sharp and need very little editing… well in principle.

The contest was held outside on a bright sunny day. I found a narrow corner that was out of the way and wouldn’t be disturbed. I still sandbagged the lights and the tripod with 25lbs weights. This was a great thing because there were some strong breezes that could have knocked over the camera and blown the lights away. Even indoors, it’s a good idea to sandbag the setup because kids or tipsy adults can bump into the equipment.

The narrow corner was only amenable to a 2 light setup, and in order to have people squeeze by the lighting and tripod, the key light, a softbox monolite, had to be essential on top of the camera. The fill light had be very close to the subject and set wide right and I used a monolite with a shoot-through-umbrella. The umbrella was set far enough off-center so that only one catchlight appeared.

The eating contest was going to have roughly 12 contests with a Win-Place-Show for each contest. They had victor crown and I decided that the victors for each event would be photographed with the crowns, with the King’s crown for the winner, the Queen’s crown for the second place and the Pharaoh’s hat to the third place. This went over pretty well and documented the winners for posterity.

I used my APS-C crop sensor camera for this shoot and used my full frame camera for the candids. Tend to be moving faster and hence more light. In order to the ISO down, a full frame works better (roughly one stop better). It’s also good, because the photobooth camera was going to be largely unattended throughout the night and I’d hate to lose or damage the full-frame (roughly four times more expensive).

On the camera, I used the 16-50mm f/2.8 kit lens. It’s a crop-sensor only lens, but it’s very nice and produces pretty good shots. It’s effectively a 24-75mm lens after taking into account the 1.5 times crop factor. You need pretty wide angles for photobooths when a group of people are cramming in, but when you have one or two people, it’s good to be able to get to 55-80mm (or longer if you have enough space).

As I described above, the lighting setup had some constraints to work around. We got stuck in a bit of traffic getting there, so we were down to about 15 minutes to set up — enough to get it set up comfortably, but not enough to experiment a lot. What ended up happening is that the exposures came off a bit cool. I didn’t get a chance to set a custom white balance and because the lights were in pretty close (only 8 feet/3 meters from the subject) the lighting was harsher than I would have liked.

Nevertheless, it still provided tack sharp images. The only issue was that they required some editing. The good news was that the same editing worked on every shot — which is one of the wonders of controlled lighting. I had to drop the highlights and bring out the shadows and dropped the blacks to not lose contrast.  I bumped up the vibrance and saturation to brighten the skin tones. I manually changed the white balance, bringing up orange and green. These weren’t huge changes, but you can see the difference. I think the photo quality is good and could stand up to printing.

The catchlight was a bit too dead-center on, but there was not much to be done. I would have liked to used a hair light shooting down in a strip box to help even out the light in the background. I don’t think it would have worked, but I didn’t get a chance to try it.

I’ll give myself a pass on this one. But I could have nailed it better.

Head Shot For Young Professionals

Head Shot Set Shoot

I had a head shot booked Saturday morning with two young, professional twins looking for photos for their workplace websites. I set up the home studio with a simple white backdrop.

I wanted to do a four light set up, a key and fill plus two hair lights to give a symmetric feel for any joint shots with the two twins. I first exposed the hair lights and set the exposure to f/2.8. The hair lights were in strip boxes with speedlites aimed down. I then set up the fill light to f/4.0 with a monolight with a shoot-through umbrella. Finally, I set up a softbox monolight as the key light exposed to f/5.6.

I set the lighting expose on the low side because my home studio has a low ceiling with white paint, which thankfully isn’t gloss. In the past, brighter exposures have had problems with bleed over from light bouncing off the walls and ceilings. I sometimes set up black backdrops on the sides and even the ceiling to control the bounces. But I didn’t want to set up these control measures because they look a bit ghetto, particularly the backdrop covering the ceiling.

After the shoot began, it went pretty fast, we knocked about 200 shots off divided evenly between Ashley, Dana and the pair together.  Throughout the shoot I used an 85mm f/1.4 on a full-frame camera shooting without a tripod and a 135mm f/1.8 on a APS-C crop sensor for an effective focal length of 202.5mm mounted on a tripod. The 85mm came out very well and provided more unique shots because of the free form, but the best shots in the lot were on the 135mm, which is better length for portraits.

I included a crop of the catch-lights. I’d be a bit happier with the catchlights being more symmetric and a bit wider. I am thinking about getting a second softbox and white shoot-through umbrella to be able to get symmetric catchlights.  I like the look when catchlights frame the pupils.  I wasn’t gong for that look here, but I think angling both catchlights wider would have given a better result.

Two shoot day

Image

Since I’m an amateur, I usually only do at most one shoot a day, but today I ended up being double booked with one shoot in the home studio and the other on location.  I don’t have a dedicated space for my home studio, so I have to put it up and take it down whenever I do a shoot.   It ends up being quite a bit of work, but it does produce reasonable results.  Location shoots are fun, though they present their own challenges getting enough shots.

I did a headshot shoot in the home studio for some twins.  They’re young professionals and needed some professional shots for their school and and internships.   I set up a four light shoot with a simple white backdrop with a soft box key light, a shoot-through umbrella as a fill and a pair of strip boxes shooting down as hair lights.  we knocked out a couple outfit changes for each and a couple of candid photos of them as a pair.    I used a 135mm f/1.8 and a 85mm f/1.4.  Both work great for studio work.  Today I had the 135 on the APS-C sensor bringing the range to an effective 202.5mm, which is great for portraits.  I had the 85 on the full-frame.

In the afternoon, I went over with my husband to an eating contest.  It was held outdoors with beautiful Bay Area weather.  We set up a two-light photobooth to take photos of the victors and then had another camera doing candids.  For the photobooth, we used an APS-C camera with a 16-50mm f/2.8 lens.  For the candids we used a 24-70mm f/2.8, 16mm f/2.8, 85mm f/1.4 and 135mm f/1.8.  The 135mm f/1.8 is a relatively new lens for us, but it is has quickly become one of our favorites.  It’s a Zeiss Sonnar lens design and produces crisp images with beautiful colors.  It’s amazing when we switch over the 24-70 to the 135, the change in image quality is stunning.  If it wasn’t for the lack of range, I might stick with it for entire candid shoots.

The eating contest produced a lot of great shots and had a lot of scenes.  The best scenes were the pie eating contest, the Odwalla drinking contest and the hot wing eating contest.  We got to meet some great people, I also got to meet some of my husband’s acquaintances.

Two Light Set Up

Screen Shot 2013-05-24 at 10.47.42 PM

We had a friend come over for a quick shoot. She’d worked as a model when she was young and boy could she nail looks. We used primarily a soft box key light just off center and then a wide angle shoot-through umbrella 4 stops down as a fill light. Probably should have brought that up a bit and then angled it down to fill in her hair more.

This shot was at f/6.3 with an 85mm lens at 1/200s at ISO100. I was pretty happy with the skin tones and the beautiful catch-light. This shot was an early test shot and has a few stray hairs that I could have photoshopped out. We got a little bit more careful later in the shoot. An extra light on the backdrop could have help lighten that up a bit.

Quick Three Light Set Up

Quick Three Light Set Up

I had a neighbor’s toddler over for a quick shoot. I had two strip boxes set up and a hair light shooting down with a shoot-through umbrella. The hair light was 3 stops down from the strip boxes. I used a neutral density filter on an 85mm f/1.4 to drop the f/11 exposure down to f/4.0.

Party Photobooth

Party Photobooth

I photographed a beautiful 50th birthday party recently. When I do parties, I like to set up some lighting in the corner to take portraits. You can knock off a bunch of portraits really fast and not totally rely upon candids to get the shots of the evening. I love the look of candids, but they are dicey.  Usually I just use a single soft box key light to keep things simple and non-intrusive. This time, I had a proper walled-off corner where I could set up and not be in the way.

I used a soft box key to the right, a fill shoot through umbrella, and then two hair lights in strip boxes shooting down on the subjects.  I used a 24-70mm at 24mm on a crop sensor at f/7.1 and was a 50mm f/8.0 for most of the night.